Golang工程实践 | 字数总计: 1.4k | 阅读时长: 6分钟 | 阅读量: |
1
2
3
4
5
6
7
8
9
10
11
12
13
14
15
16
17
18
19
20
21
22
package mainimport ( "fmt" "time" ) func hello (i int ) fmt.Printf("hello goroutine: %d\n" , i) } func HelloGoRoutine () for i := 0 ; i < 5 ; i++ { go func (j int ) hello(j) }(i) } time.Sleep(time.Second) } func main () HelloGoRoutine() }
该代码可实现并发打印0~4这五个数,Sleep暂时只是实现这5个协程同步的一种不优雅的实现手段,后面有更优雅的手段。
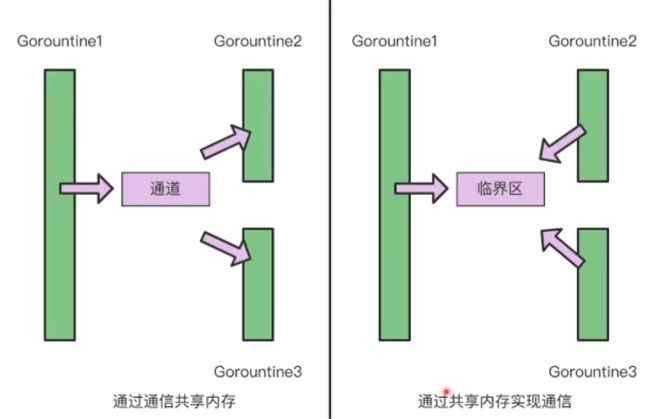
在Golang中,提倡使用通信来共享内存 ,而不是通过共享内存实现通信。
Channel是一种引用类型,需要通过make关键字来构造
make(chan 元素类型, [缓冲大小])
有缓冲通道 make(chan int)
无缓冲通道 make(chan int, 2)
其实这就是一种典型的生产者消费者模型,缓冲大小即为队列大小,若队列为空,则接收方接收时阻塞。若队列满,则发送方发送时阻塞。
1
2
3
4
5
6
7
8
9
10
11
12
13
14
15
16
17
18
19
20
21
22
23
24
25
package mainimport "fmt" func main () src := make (chan int ) dest := make (chan int , 3 ) go func () defer close (src) for i := 0 ; i < 10 ; i++ { src <- i } }() go func () defer close (dest) for i := range src { dest <- i * i } }() for i := range dest { fmt.Println(i) } }
设第一个goroutine为A,第二个goroutine为B
这块代码实现了,协程A不断向无缓冲通道src中发送1…9,协程B不断地接收,计算出1…9的平方数,发送到有缓冲通道dest中,最后主协程不断地从dest中接收得到最终结果。
Golang也提供了通过共享内存实现协程同步的手段,即标准库提供的sync.Mutex
通过五个协程对同一个变量并发执行2000次+1操作,正常来说结果应该时10000
1
2
3
4
5
6
7
8
9
10
11
12
13
14
15
16
17
18
19
20
21
22
23
24
25
26
27
28
29
30
31
32
33
34
35
36
37
38
39
40
package mainimport ( "fmt" "sync" "time" ) var ( x int64 lock sync.Mutex ) func addWithLock () for i := 0 ; i < 2000 ; i++ { lock.Lock() x += 1 lock.Unlock() } } func addWithoutLock () for i := 0 ; i < 2000 ; i++ { x += 1 } } func main () x = 0 for i := 0 ; i < 5 ; i++ { go addWithoutLock() } time.Sleep(time.Second) fmt.Println("WithoutLock: " , x) x = 0 for i := 0 ; i < 5 ; i++ { go addWithLock() } time.Sleep(time.Second) fmt.Println("WithLock: " , x) }
运行结果
不加锁的结果输出不正常
1
2
WithoutLock: 8491 WithLock: 10000
WaitGroup中维护了一个计数器,可以实现同步
本文开篇的代码使用Sleep暴力同步,通过WaitGroup改进如下
1
2
3
4
5
6
7
8
9
10
11
12
13
14
15
16
17
18
19
20
21
22
23
24
25
package mainimport ( "fmt" "sync" ) func hello (i int ) fmt.Printf("hello goroutine: %d\n" , i) } func HelloGoRoutine () var wg sync.WaitGroup wg.Add(5 ) for i := 0 ; i < 5 ; i++ { go func (j int ) defer wg.Done() hello(j) }(i) } wg.Wait() } func main () HelloGoRoutine() }
GoModule
暂时略
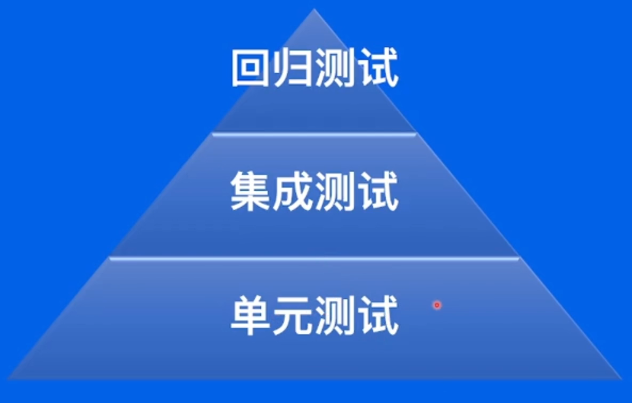
回归测试 :当发现软件系统缺陷后,或在软件中添加新功能后,重新测试。用来检查被发现的缺陷是否被改正。
集成测试 :使用自动化测试工具进行测试,如通过服务暴露特定接口,通常测试某个功能
单元测试 :在开发阶段对某个函数,某个模块进行测试
如上图,测试从上到下测试成本逐步降低,测试覆盖率逐步扩大。
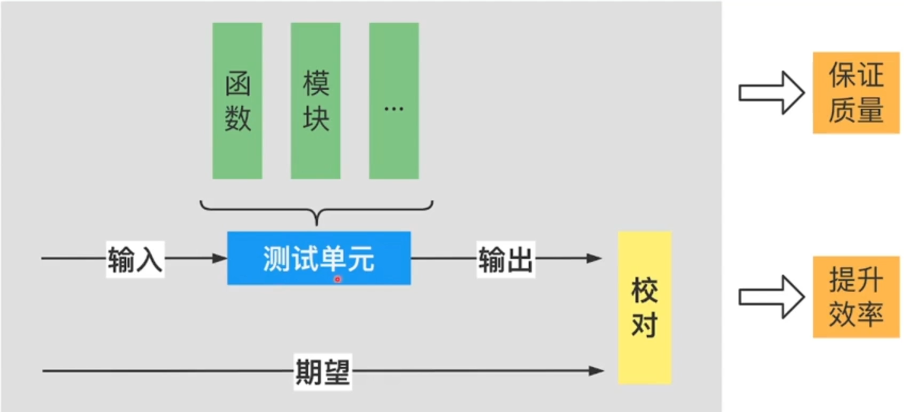
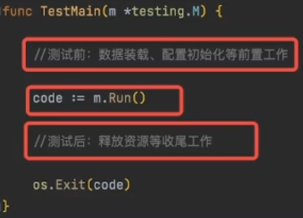
如下图为单元测试的流程
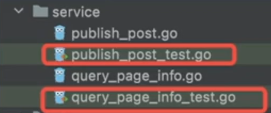
所有测试文件以_test.go结尾
测试函数为func TestXxx(*testing.T)
初始化逻辑放到TestMain中
编写print.go文件内容如下,
1
2
3
4
5
package mainfunc HelloTom () string { return "Jerry" }
编写print_test.go文件内容如下,
1
2
3
4
5
6
7
8
9
10
11
12
package mainimport "testing" func TestHelloTom (t *testing.T) output := HelloTom() expectOutput := "Tom" if output != expectOutput { t.Errorf("Expected %s do not match actual %s" , expectOutput, output) } }
直接通过go test命令即可完成单元测试
1
2
3
4
5
6
PS C:\Users\i\GolandProjects\course2> go test --- FAIL: TestHelloTom (0.00s) print_test.go:10: Expected Tom do not match actual Jerry FAIL exit status 1 FAIL course2 0.203s
可以使用testify库改进单元测试
go get github.com/stretchr/testify
go mod tidy
1
2
3
4
5
6
7
8
9
10
11
12
package mainimport ( "github.com/stretchr/testify/assert" "testing" ) func TestHelloTom (t *testing.T) output := HelloTom() expectOutput := "Tom" assert.Equal(t, expectOutput, output) }
1
2
3
4
5
6
7
8
9
10
11
12
PS C:\Users\i\GolandProjects\course2> go test --- FAIL: TestHelloTom (0.00s) Diff: --- Expected +++ Actual @@ -1 +1 @@ -Tom +Jerry Test: TestHelloTom FAIL exit status 1 FAIL course2 0.248s
纠正print.go
1
2
3
4
5
package mainfunc HelloTom () string { return "Tom" }
1
2
3
PS C:\Users\i\GolandProjects\course2> go test PASS ok course2 0.236s
编写judgment.go文件
1
2
3
4
5
6
7
8
package mainfunc JudgePassLine (score int16 ) bool { if score >= 60 { return true } return false }
编写judgment_test.go文件
1
2
3
4
5
6
7
8
9
10
package mainimport ( "github.com/stretchr/testify/assert" "testing" ) func TestJudgePassLine (t *testing.T) assert.Equal(t, true , JudgePassLine(70 )) }
使用命令go test judgment_test.go judgment.go --cover可以进行测试并计算测试覆盖率
1
2
PS C:\Users\i\GolandProjects\course2> go test judgment_test.go judgment.go --cover ok command-line-arguments 0.237s coverage: 66.7% of statements
可以看到输出结果覆盖率为66.7%,实际上当执行测试后,被测函数只真正执行了两行代码,总共有效代码为三行,故测试覆盖了2 3 = 66.7 % \frac{2}{3}=66.7\% 3 2 = 6 6 . 7 %
我们可以再加一个测试用例,
1
2
3
4
func TestJudgePassLine (t *testing.T) assert.Equal(t, true , JudgePassLine(70 )) assert.Equal(t, false , JudgePassLine(50 )) }
可以看到下面的测试结果显示测试覆盖率达到了100%
1
2
PS C:\Users\i\GolandProjects\course2> go test judgment_test.go judgment.go --cover ok command-line-arguments 0.239s coverage: 100.0% of statements
一般测试覆盖率达到50%~60%即可,较高的覆盖率在80%+
测试分支相互独立、全面覆盖
测试单元粒度足够小,函数单一职责


 wechat